


Hackers and snakes—oh my! What do they have in common? Both are shady characters that can hide in plain sight, just waiting for the right moment to strike.
But how do you know if you have any unwanted pests nearby? Often, you just need to go looking for them—and that’s exactly what we did. Along the way, we found a very shady Python (and coincidentally, a friendly RAT) just waiting to strike.
Join us on our journey as we show just how important it is to keep your yard—both the real one with green grass and the virtual one with bytes and binaries—clean and tidy. Otherwise, you never know what kind of shady creatures may be lurking in the shadows.
We recently investigated a suspicious link file persisting in a user’s startup folder. The file was named “sysmon.lnk” and looked a bit fishy. After some quick initial investigation, we found that the link was executing a malicious Python script that was used to inject a remote access Trojan (RAT) onto the system.
Along the way, we encountered a total of six consecutive payloads and some new offensive tooling which we found pretty interesting. Towards the end, we also experimented with some custom scripts for de-obfuscating data and extracting configuration from the final RAT, resulting in some juicy indicators of compromise (IOCs) with 0 detections on VirusTotal (as of June 2021).
Before we go too much further, here’s a visual representation of the malware we encountered.

We stumbled upon a suspicious file (sysmon.lnk) that appeared to reside in a user’s startup directory. The nature of the startup directory is to hold files that automatically run when a user logs into the computer. Since it looks just like a normal folder, all you need to do is copy and paste a file into the folder, and boom—you can persist, or stick around, between reboots.
This provides an easy way for legitimate programs to stick around and keep running. Given its simplicity and stealth, it’s a common place that attackers will place malware and malicious files that they want to stick around.
Want to learn more about persistence? Download our eBook Persistence: The Key to Cybercriminal Stealth, Strategy and Success.
Here’s a snippet of what we saw:
c:\\users\<username>\appdata\roaming\microsoft\windows\startmenu\programs\startup\sysmon.lnk
This is a .lnk file (also known as a shortcut file), which redirects to another file or command on the system. Inspecting the.lnk file can tell us where it points to.
When we inspected sysmon.lnk, we found that it was redirecting to a suspicious “ctfmon.exe” with “update.py” passed as an argument. Both were residing in a suspicious-looking directory:
c:\users\<username>\appdata\roaming\PpvcbBQh\ctfmon.exe
c:\Users\<username>\AppData\Roaming\PpvcbBQh\update.py
So, we retrieved the files and did some analysis.
First, we noticed that the hash of ctfmon.exe had 0 detections on VirusTotal, which we found interesting at first but were able to understand after looking at the file’s information. (Typically we can’t trust file version information without a valid signature, but in this case, the information made sense).
The information suggested that ctfmon.exe is a renamed Python interpreter—specifically, an IronPython interpreter, which utilizes a branch of Python with access to .NET libraries. This allows Python code to access deep Windows OS functionality typically reserved for .NET or PowerShell. This was interesting and provided enough information to confidently move on to the Python file.

We can see that the original file ctfmon.exe had 0 detections on VirusTotal, as technically it’s a legitimate interpreter and not a malicious file.
Below, we can see the file description, indicating that it was a renamed IronPython interpreter. Alternatively, we could have also discovered this information using PeStudio or a similar tool.


This was enough information to determine the purpose of the ctfmon.exe file, so we moved on to the Update.py file, which we’ll refer to as stage1.py.
We first moved the Python file into a text editor within a Virtual Machine just in case it was malicious—and spoiler alert: it was. 😅
This led us to a relatively small script with a large obfuscated string and some obfuscated variable names. We can see the full script in this screenshot:

This wasn’t super pleasant to read, so we cleaned it up a bit and added comments, which left this script:

If we inspect closer, we can see that the script achieves four main things:
By copying out the obfuscated string and recreating the logic in CyberChef, we were able to retrieve another Python script—which we saved and named as stage2.py. The decoding logic can be seen below:

We copied the resulting script out of CyberChef and opened up stage2 in a text editor, where we quickly noticed another obfuscated string, as well as some imported libraries related to reflection. (In case you’re not familiar, reflection is a common technique used to execute code from memory without needing to save it to disk—in this case, the “something” would be the obfuscated string containing malware.)
Based on this information, we assumed that the script was decoding the string and loading the results into memory for execution.

In the middle of the above screenshot, we can observe two main operations used to decode the string:
This didn’t seem too complicated, so we moved back to CyberChef and recreated the decoding logic. This resulted in the appearance of an MZ header, indicating that we had successfully decoded the data and retrieved an executable file. We saved this file and named it stage3.bin.

Saving stage3 as an executable file, we were able to do some basic inspection using PeStudio and Detect-It-Easy (DIE). This quickly led us to the conclusion that this was a .NET file and likely another stager (based on the presence of a path referencing injector.pdb).
Below, we can see that DIE recognized the file as a .NET executable, which meant we could use Dnspy or ILspy for analysis.

Below, we can also see the PDB path with references to “injector.pdb”, indicating that this is likely another stager doing some kind of injection:

Since we now knew that this was a .NET file, we moved over to Dnspy where we could view the source code of the file. This can be seen below.

Just looking at the function names alone, we got a strong indication of what the file was going to do. We can see functions indicative of Injection (VirtualAlloc, WriteProcessMemory, etc.), Dynamic Library/Function loading (GetProcAddress, LoadLibrary) and decoding (compress, decompress, base64_encode). Without looking at the code in detail, we could already assume the core functionality: an obfuscated payload is going to be decoded and injected into a process.
Browsing to the main function, we quickly found the encoded payload. Combined with the preceding function calls (Load, Decompress, Base64), we can assume that the data is being Base64 decoded and then decompressed and loaded into memory.
Below, we can see the encoded string and related function calls:

Towards the end of the encoded data, we also observed a reference to msbuild.exe. This became important later, as it turned out to be the second argument passed to the Mandark.Load method.

Next, we browsed to the Mandark.Load method to find out what else was happening—and to determine the significance of that msbuild.exe argument.
This led us to the conclusion that the second argument passed to the load method becomes the target process for the injection. We also noted the use of ZwUnmapViewOfSection, indicating that this style of injection is process hollowing. MITRE ATT&CK defines process hollowing:
“Adversaries may inject malicious code into suspended and hollowed processes in order to evade process-based defenses. Process hollowing is a method of executing arbitrary code in the address space of a separate live process.”
We believe that MSBuild was likely targeted as it is often allowed to execute by default application whitelisting tools, including Microsoft's own Applocker.

With this new knowledge, we decided to move back to the main function and try to decode the injected payload. We already noted that Base64 encoding and compression was used.

We quickly inspected the decompress method to confirm the compression type—in this case, it was Gzip.

Combining the above information together, we were able to decode the next payload using CyberChef. This resulted in another MZ header for an executable file. We saved this file and named it stage4.bin. Note that this payload would likely have been injected into the msbuild.exe process.

Loading up stage4.bin, we performed some basic static analysis and determined that it was not another .NET file, so we weren’t able to use Dnspy.
Below, we can see the detected compiler using DIE, which suggested that it was written in C++/C and not .NET.

Using PeStudio, we noticed this exported function, which stood out to us as it indicated that this was likely another loader (given away by the term “ReflectiveLoader”).

We noted this and kept going.
Browsing further, we noticed this reference in the debug section of the file. This contained another PDB path, and a very git-like folder structure.

Some googling of keywords in the PDB path led us to believe that the file was likely an execute-assembly loader, which is an open-source re-implementation of the Cobalt Strike execute-assembly module:

If the GitHub repository is anything to go by, this is an extremely well-featured and interesting loader that incorporates some really cool evasion tactics. We could almost dedicate an entire blog to the capabilities of this loader, but today, we’ll stick to its loading capabilities and try to focus on finding the next payload.
Within the rest of the GitHub repository documentation, there was this particular tidbit (see below) which really stood out. It indicated the structure of embedded payloads, which should be in the format of “0|0|0|0|1|sizeofpayload.b64_encoded_compressed_payload”. (Note: The payload is going to be in Gzip compressed and Base64 encoded format.)

This was super interesting because there was a very large string within the file, which matched that exact description (and was 64983 bytes in size—more than enough room for another payload).

We copied that string into CyberChef and re-implemented the decoding routine (Base64 and Gzip decompress), which resulted in yet another executable file.

You know the drill by now—we saved this file and named it stage5.bin.
Performing our usual static analysis of our latest file, we soon realized that it was another .NET (yay). Luckily, we could jump back into Dnspy and view the source code.

Moving into Dnspy, we noted that there weren’t many functions this time—only six in total:

Navigating to the main function, we noted two large obfuscated strings:

The first one was just Base64 encoded and turned out to be an anti-malware scan interface (AMSI) patching script. Implemented by Microsoft, AMSI provides a framework for security tooling to monitor PowerShell script activity. The goal of an AMSI patch is to bypass this framework and reduce the chances of an antivirus or EDR detecting any malicious PowerShell activity. (Later, we’ll see that the malware does use PowerShell scripts, so this patch likely allows them to execute without being detected.)
Below, we can see the full AMSI patching script, which was lightly obfuscated.

We were able to decode the script, which loosely translated to this below.

The second string was far more interesting, as it incorporated a custom encoding routine alongside the Base64 and compression that we’ve been so far accustomed to. This was an indication that we need more than just CyberChef alone to decode our next payload.

In order to get a better understanding of the obfuscation, we inspected the Cipher method and found the encoding routine. It didn’t look standard, and clearly, it was something custom-built—although not extremely complicated to decode. Routines like this are often used to evade automated analysis, as the non-standard nature hinders some automated tooling—often requiring manual intervention and analysis to decode properly.
Below, we can see the full custom routine, which takes an encoded string, a key and an encipher flag.

Browsing back to our main function, we quickly found the key “avyhk” and encipher flag, which was set to false.

We decided not to pursue CyberChef for this. After some careful inspection and analysis, we were able to re-implement the routine using the equivalent Python code included below.

Using our new Python script, we wrote a wrapper around our cipher function and we were able to dump the decoded content to a new file. Using this, we ended up with another executable file: stage6.bin.
We saved and loaded the stage6.bin file into PeStudio and DIE for some static analysis and saw that we had another .NET file. (Yay for Dnspy again!)

Overall, we didn’t find anything of particular use within PeStudio, so we moved on to Dnspy. We were able to determine that the file was a remote access Trojan (RAT), likely from the URSU family of malware.
This malware had all the typical functionality of a RAT, which included the ability to gather and enumerate system information, as well as download files and commands from a remote command-and-control server.
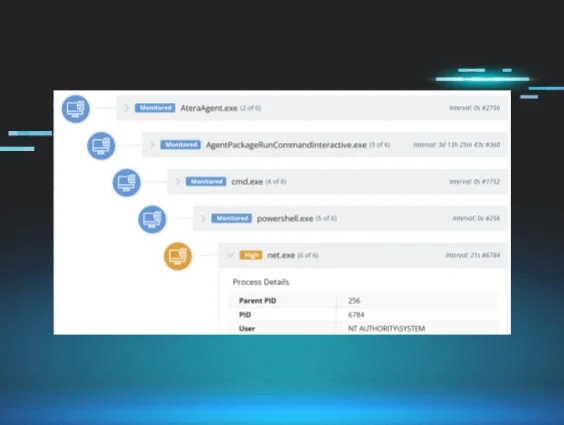
Below, we can see a graphic overview of the functionality of the final RAT payload.

After determining that this malware was likely a RAT, we decided to look for indicators of the C2 server and any configuration settings that we could use as indicators of compromise. Analyzing the RAT code within Dnspy, we found an “InitializeSettings” method that was loading config data from values encrypted with AES256, and then encoding using Base64.
Here’s the code for decrypting config data within the InitializeSettings method:

Below, we can see the AES256 encrypted and Base64-encoded values being loaded.

After playing around with the decryption code, we were able to decrypt the config and pull out the following values—including a port number, mutex name, version and grouping numbers, as well as three domains of C2 servers.

Through a combination of queries made to the OS, mostly via WMI queries, the malware gathered the following information to send to the C2 server:
After enumerating system information, the malware then executed some anti-analysis checks to see if it was running inside of a virtual machine or analysis environment.
The malware contained several methods and functions for detecting this. These were relatively simple and consisted of five main checks:
If any of the above checks are true, then the malware cleans up and terminates itself with the “failFast” method.
Below, we can see the names of the anti-analysis functions being called.

None of them were particularly interesting or complex, and all followed a similar structure to the screenshot below.

Once the anti-analysis checks were completed, the malware established further persistence via scheduled tasks and run keys, depending on the current privilege level.
If admin privileges were available, then an elevated scheduled task is created. This would allow the malware to persist with admin-level privileges across reboots, without the need for UAC prompts each time.
If only standard user privileges were available, a .bat script would be placed into the current user’s run key, which would provide persistence with standard user privileges.
Using these indicators, we were able to find other artifacts left by the malware and develop detections that could be used to alert on similar activity.
You can check for similar persistence via scheduled tasks and run keys by regularly reviewing the following run key and scheduled task locations:
(Alternatively, sign up for a free trial and we’ll take a look for you!)

Once persistence had been established, the malware then contacted the command and control servers for further commands. These commands could be...
Some short snippets of this functionality are in the screenshots below:


At the time of initial analysis (May 2021), all of the domains had 0/85 detections on VirusTotal—although one of them was marked as suspicious by one vendor.


That wraps up our analysis of this malware. We hope you enjoyed it as much as we did. Hopefully, you learned something new and will soon be able to implement some of these analysis techniques for yourself.
As we saw, even a relatively simple payload (like a RAT) can be implemented in a way that is highly complex and difficult to detect, especially when using customized or unique files and domains that slip past automated security tooling. Although automated tooling has its place, the days are gone where you can rely on such tooling alone.
You should make sure that proactive and human-driven methods of threat hunting are built into your security stack alongside layered tooling to hinder and decrease the likelihood of a successful compromise.
To wrap things up, we’d like to make a few recommendations for dealing with this type of malware:
Indicators of Compromise
windowsupdatecdn[.]cn
gjghvga7ffgb[.]xyz
huugbbvuay4[.]cn
ctfmon.exe: 3e442cda613415aedf80b8a1cfa4181bf4b85c548c043b88334e4067dd6600a6
Update.py: dd1fa3398a9cb727677501fd740d47e03f982621101cc7e6ab8dac457dca9125
stage2: 2CCADFC32DB49E67E80089F30C81F91DFFF4B20B8FC61714DF9E2348542007FD
stage3: 4591EDA045E3587A714BB11062EB258F82EE6F0637E6AA4D90F2D0B447A48EF7
stage4: 4417298524182564AED69261B6C556BDCE1E5B812EDC8A2ADDFC21998447D3C6
stage5: 9B775DFC58B5F82645A3C3165294D51C18F82EC1B19AC8A41BB320BEE92484ED
stage6: 169F5DBCD664C0B4FD65233E553FF605B30E974B6B16C90A1FB03404F1B01980


Get insider access to Huntress tradecraft, killer events, and the freshest blog updates.