


Author's Note: This blog is based on a talk I presented at JNUC 2022 in San Diego, California on September 28, 2022. It has been updated with the most recent information. The recording of the video has been made available online.
Prologue
There was a popular advertising campaign that ran between 2006 and 2009. It featured a PC, represented by an often sniffling, sick John Hodgman in an oversized suit. Opposite PC was Mac - a hip, sharp-dressed Justin Long. This set of advertisements was by Apple, and the ads typically were perpetrating the idea that "Macs don't get viruses."
This campaign was incredibly popular, but unfortunately, sowed seeds of belief into the Apple-user community that their Macs could not and will not get viruses. This idea has permeated the decade, and now in 2023, for many, this still rings true. However, in the last decade, this myth has been debunked hundreds if not thousands of times over, with CVEs, 0days, malware, adware, and even ransomware targeting the macOS ecosystem.
Interestingly enough, we'll be discussing a few tools that Apple released right around the time these advertisements ran, showing us that while Apple was doubling down on their virus immunity messaging, they were releasing tools at the same time to attempt to protect users.
I like to think of Apple's security tools like a polar bear in a snowstorm - although you can't see it, they're still there. There are many different tools that are shipped with a new Mac computer. We'll discuss some of those tools, what they do, how they operate, and if those tools are enough security for end users.
The list of tools we'll discuss are as follows:
- TCC
- File Quarantine
- Gatekeeper
- XProtect
- Malware Removal Tool (MRT)
- XProtect Remediator (XPR)
TCC
TCC, which stands for Transparency, Consent, and Control is a collection of databases that lives on the macOS system.
It will present the user with an alert when an application attempts to use specific services for the first time.
For example, in this screen capture, the user attempts to activate both the camera and the microphone. The CoreServicesUIAgent throws an alert to the user, prompting the user to 'Accept' or 'Deny' the application’s use of said service.
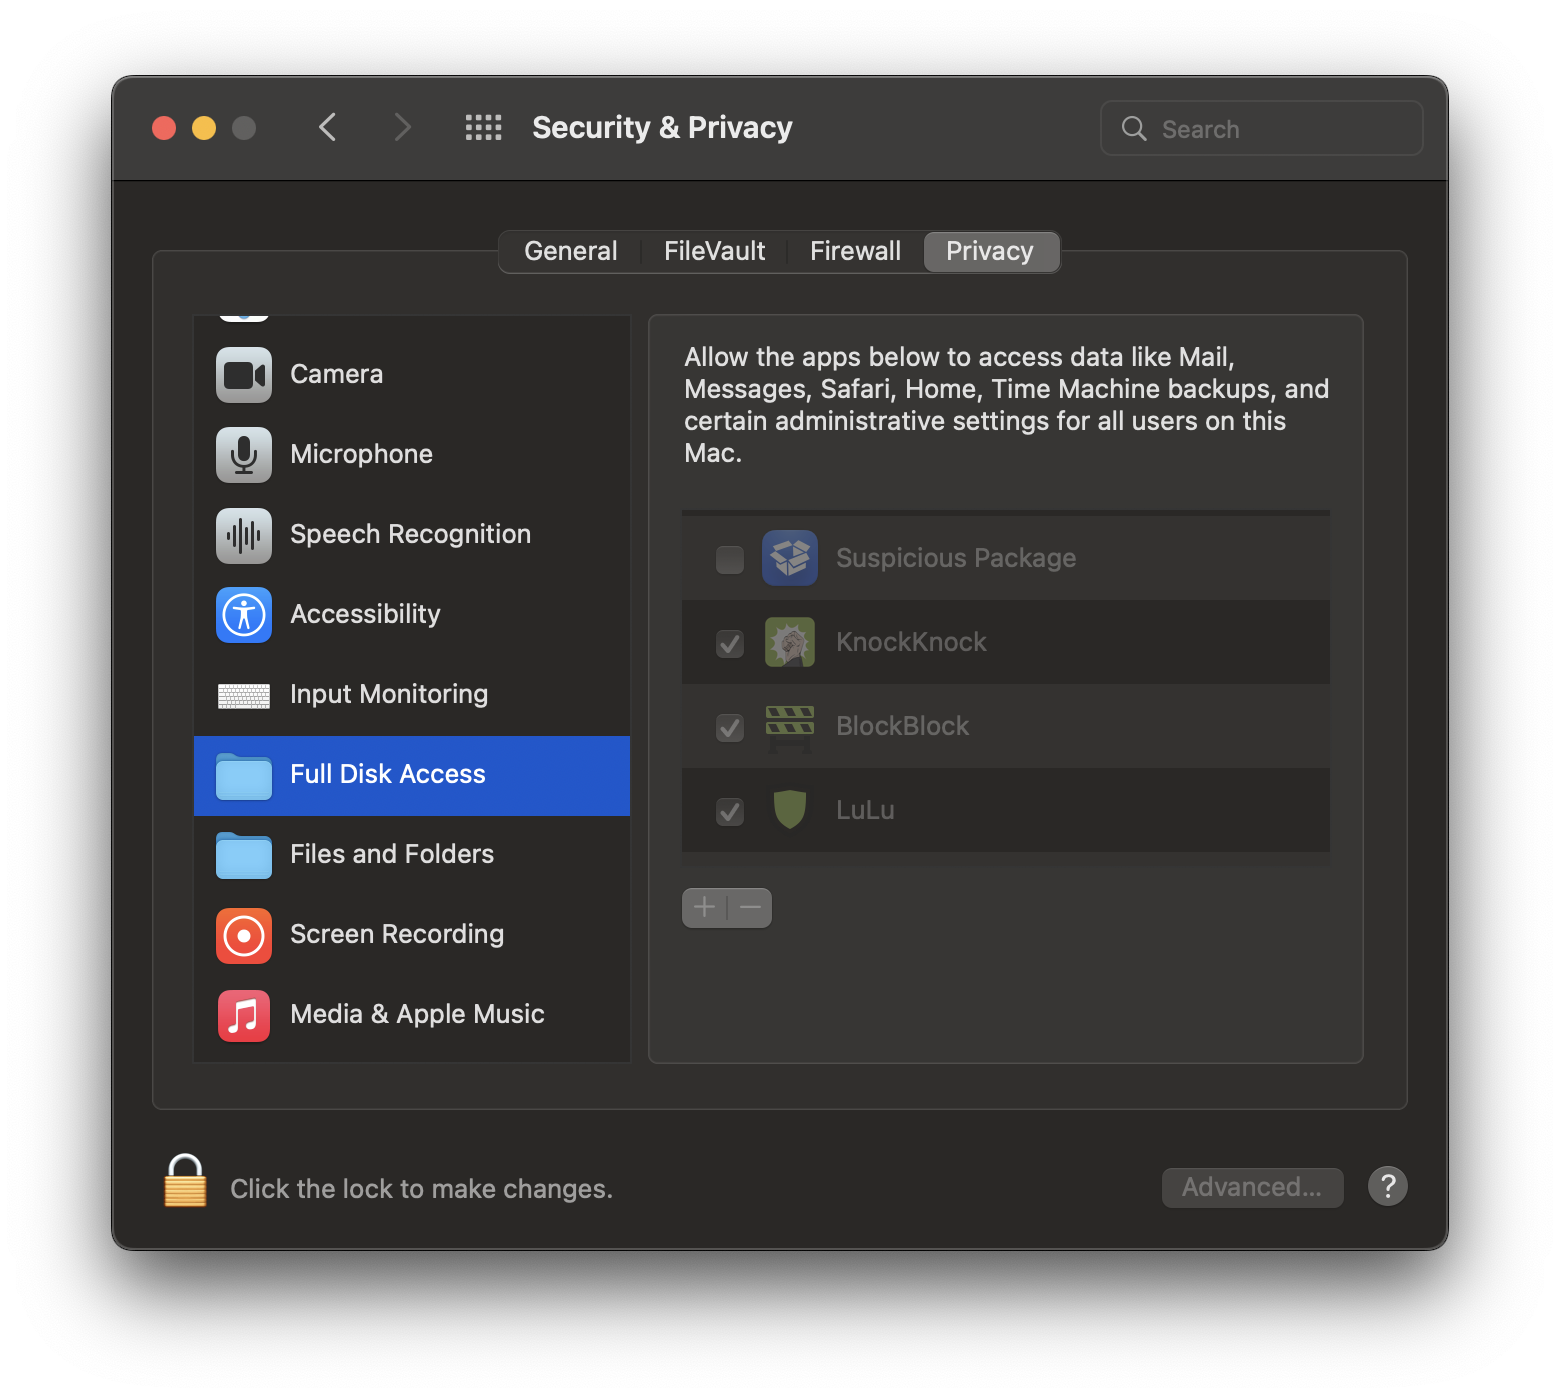
Within the System Preferences > Privacy & Security, we can actually see which applications (clients) have requested specific services. In the example below, we see four different applications which have requested Full Disk Access. This is not limited to Full Disk Access (FDA), but can also encompass the camera, microphone, user folders, location services, calendar, contacts, etc.
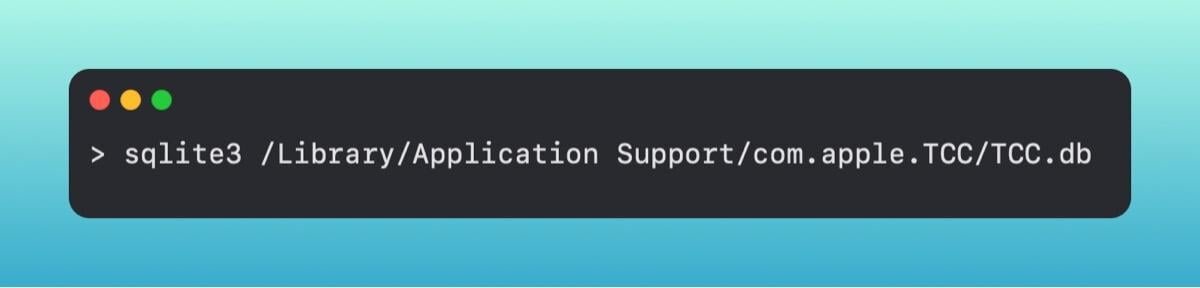
Under the hood, TCC is a sqlite database. There is one in the root directory, and additionally, one per user on the machine. We can actually open those databases, so let's open the root TCC directory and look at some entries.
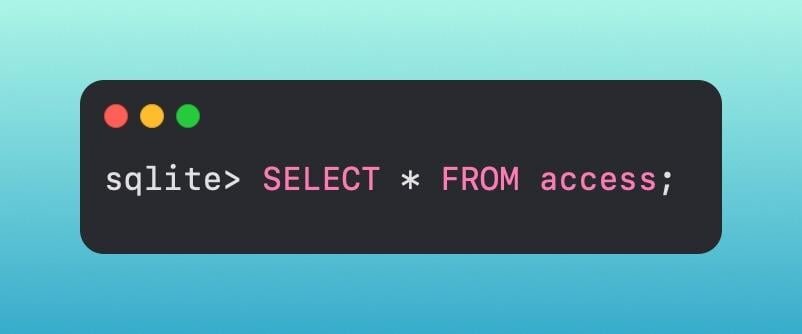
Within this database, let's grab the access table and look at some items.
This gives us a lot of information, so we can put a few constraints on our statement to grab just the information that I’m currently deeming as relevant.
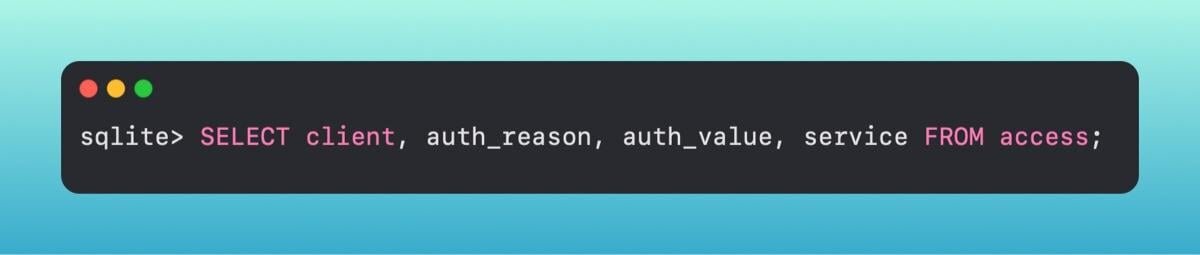
A sample of what we may get back is
com.HuntressLabs.Agent | 6 | 0 | kTCCServiceSystemPolicyAllFiles
These fields map over to a few different meanings.
The first field is the client that is making the request. In this case, a fake Huntress Agent is requesting permissions.
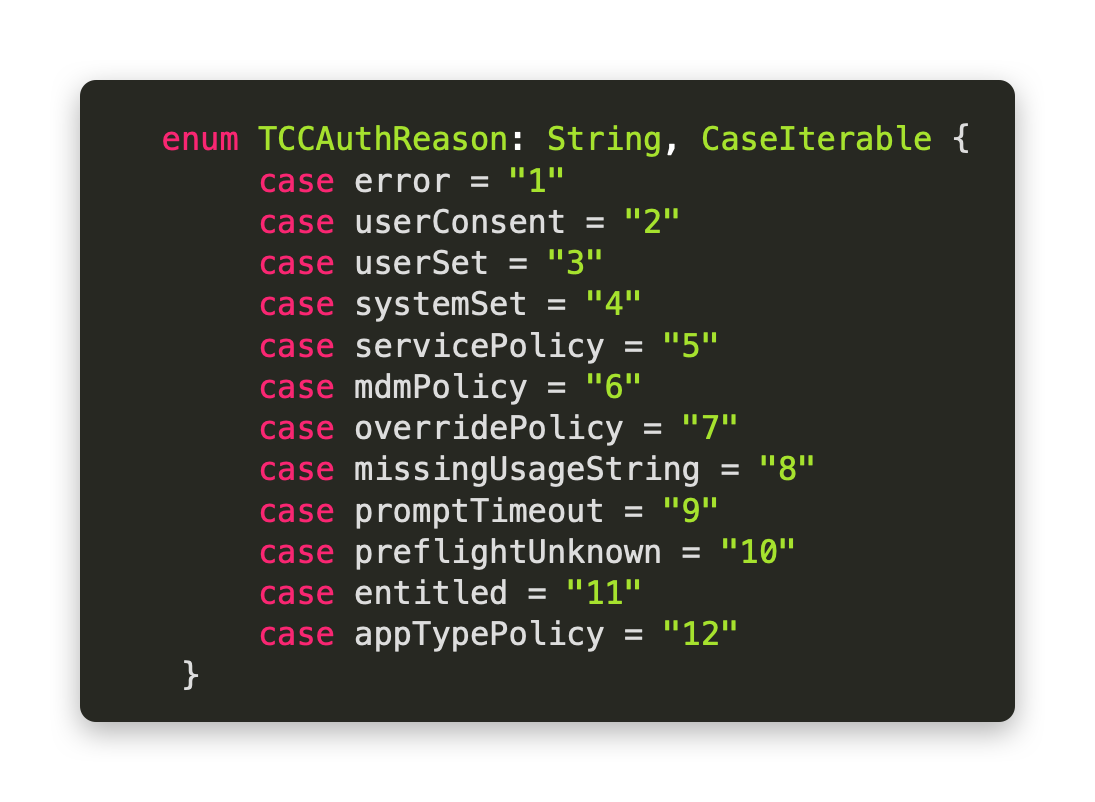
The second column, called auth_reason, is how it was requested. In our case, it was pushed down with an MDM PPPC Policy.
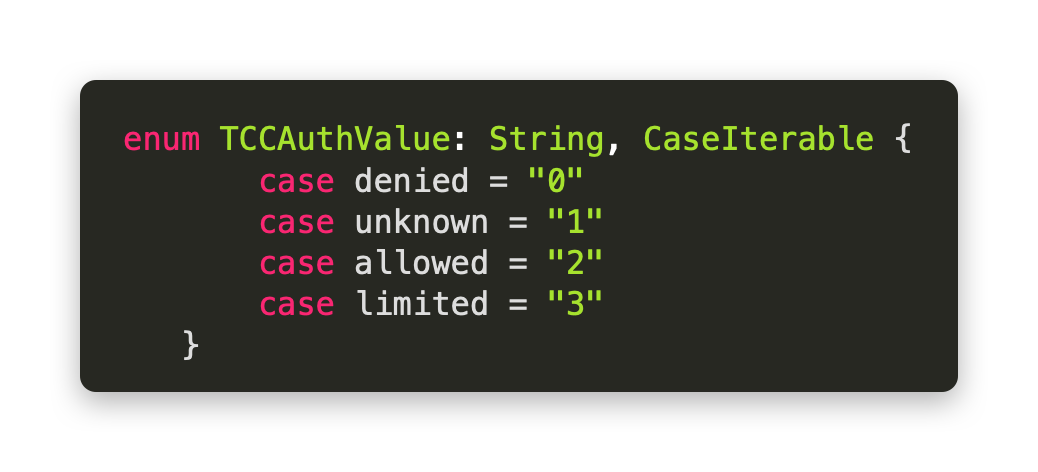
Third, is what response the user provided (or what the policy specified) - did they approve or deny the request.
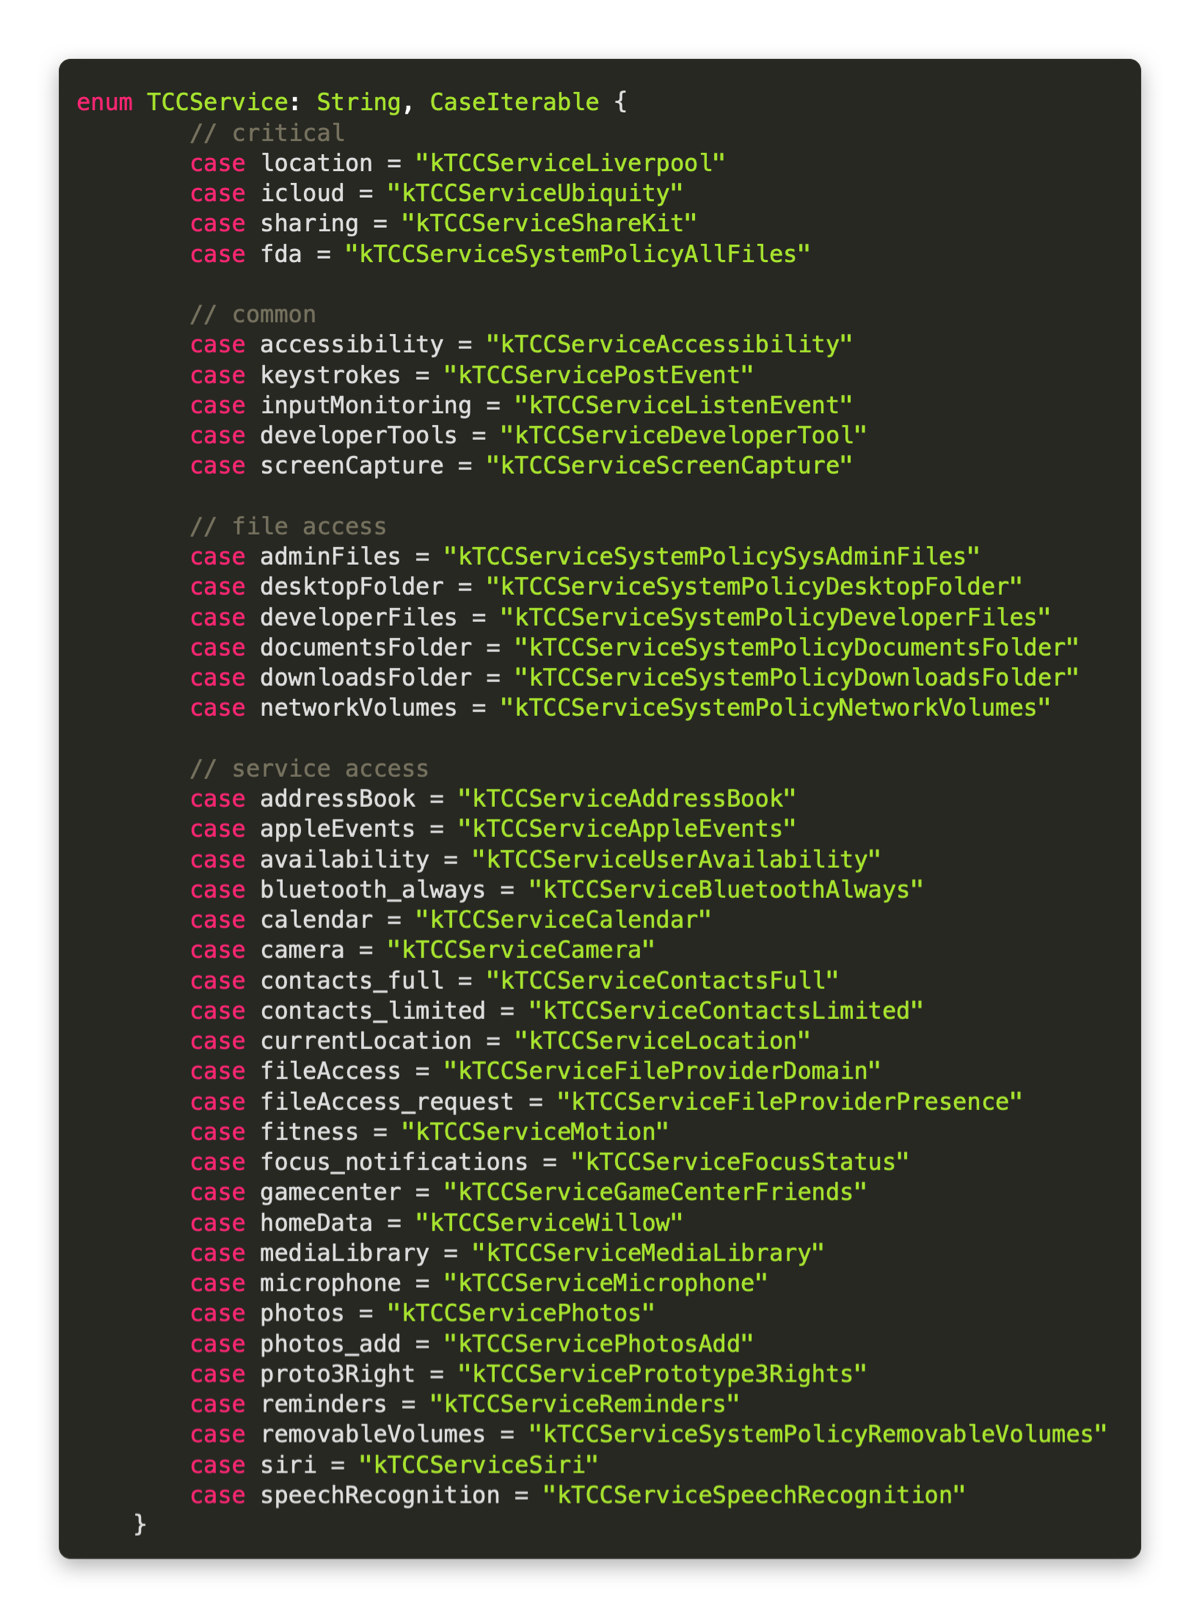
Lastly, is what service was requested. We see in our example that this is kTCCServiceSystemPolicyAllFiles. In Apple terms, this is requesting Full Disk Access.
Apple's idea behind TCC is to give user's more power over their software and applications. This helps keep software from overreaching and accessing pieces of the system that the user has not explicitly given permission for.
In the Apple tool chest, TCC is somewhat of a one-off compared to some of the other tools and how they operate, so let’s dig into the nuts and bolts of macOS security.
Check, Block, Remediate
Apple's OS operates in three steps in order to fundamentally protect its users. This is their 'check, block, remediate'. We will step through each of these, and map it over to the tool that Apple uses to enforce that functionality.
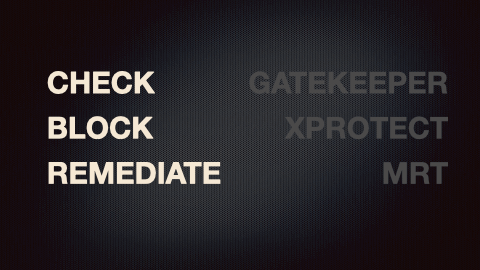
We'll start at the top with Gatekeeper, but, before we do, we'd be remiss to not discuss a fundamental preemptive step of Gatekeeper, called File Quarantine.
File Quarantine
File Quarantine is designed to inform you when an application downloaded from the internet was executed for the first time. This was introduced back in OS X 10.5 Tiger, and at its foundation, is attempting to not allow an application that was downloaded from the internet to be opened without the user's explicit permissions. Gatekeeper is built on top of this.
Once an application is downloaded and we open it, we get the prompt from - again - the CoreServicesUIAgent to ask us if we want to open this application from the internet. Once we click 'Open', a flag in the quarantine metadata is set. We can look at these flags in the extended attribute metadata.
If we run xattr <path_to_application> from our command line, it will list out the extended attributes. The one we currently care about is the com.apple.quarantine attribute. We can then print out the contents of that attribute.
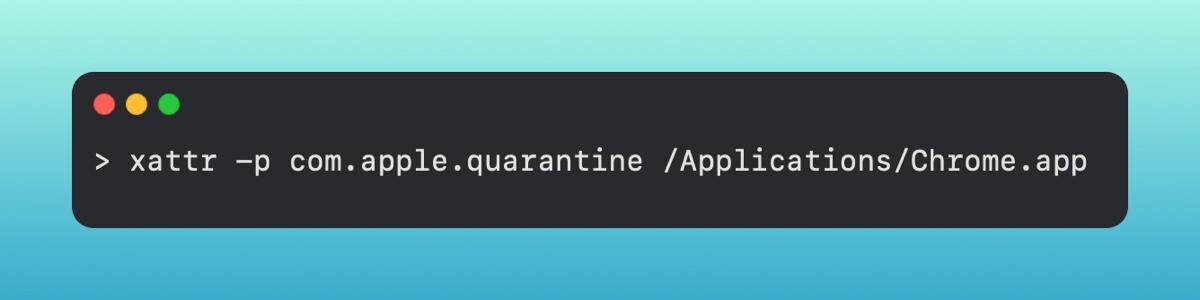
It will print out a short line of contents.
0083; 61730334; Safari; 7512FB1C-56E8-458B-88B3-DC9816210A8D
The first column is the flag. If this number is something like 0083 or 0081 this informs Gatekeeper that the app in question needs to be checked before opening it. This number gets updated depending on the action from the user after the initial opening.
The second column is a hexadecimal timestamp. In a database, this maps over to something called Mac Absolute Time. 61730334
The third column represents the browser from which our application was downloaded. We downloaded the Chrome installer from Safari.
Lastly, is a UUID associated with the application. This is primarily used within the database it's stored in as an identifier.
Once Gatekeeper has checked this information, the first flag is updated to something like 01c2 or 01c3.
All of this information is stored in the LSQuarantine database at ~/Library/Preferences/com.apple.LaunchServices.QuarantineEventsV2. From here, we can analyze the events in this database.
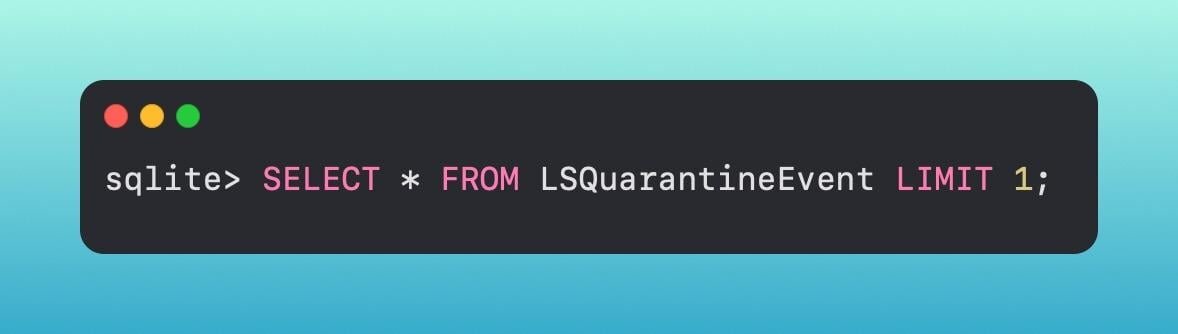
Now we can see the UUID from the original quarantine information, as well as where the application was downloaded from, the timestamp, and more.
So how does Gatekeeper work alongside file quarantine?
Gatekeeper
For a little background, Gatekeeper is really just a frontend for the spctl binary on macOS.
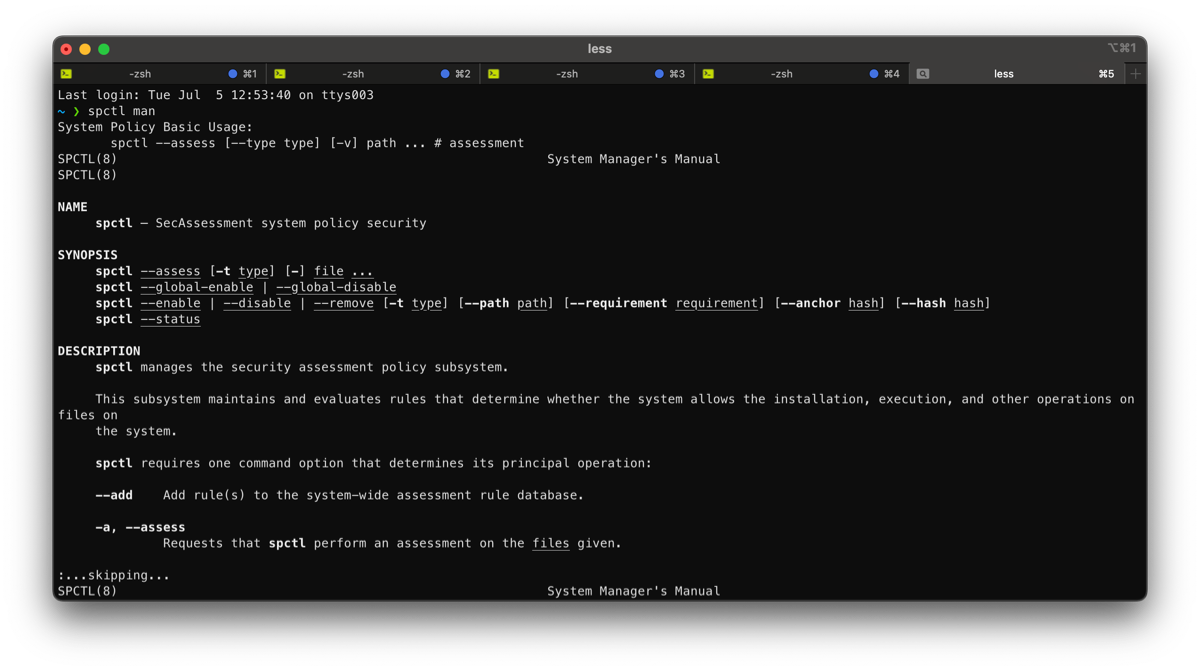
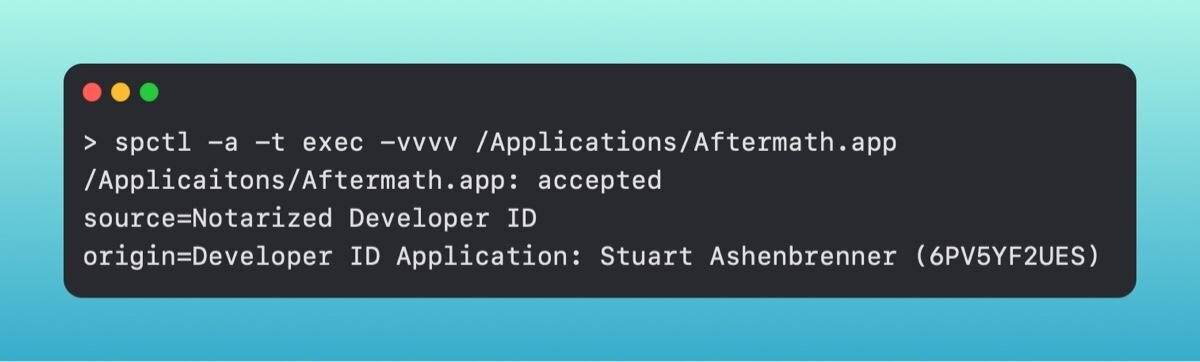
You can use spctl directly from the command line to check if an application is signed and notarized, which is primarily Gatekeeper’s functionality.
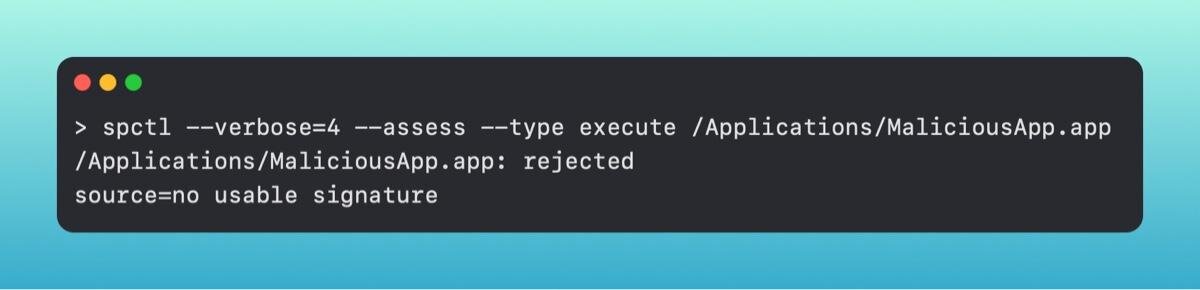
This informs you that the application MaliciousApp is not signed and will not be allowed to open by Gatekeeper, whereas the following application would.
The way Gatekeeper differs from file quarantine is that it applies to something being executed, not necessarily something opened only from the internet. For example, if you were to download a gif or picture and open it in the Apple-native Preview application, it wouldn't get checked. On top of that, Gatekeeper deals only with items being double-clicked. If I were to make a bash script and append the .command file type to it, it becomes a clickable script. The clickable .command script would be checked by Gatekeeper, but a simple .sh script that is executed from the command line would not be.
If an application is blocked, you will get a pop up informing you that it can't be opened, as it's from an 'unidentified developer'.
Gatekeeper first will check to see if the application is signed. It will then verify if that signer is legitimate or not.
It first checks the Gatekeeper database to see if the team/developer ID is a known-bad ID. This is located in /Library/Apple/System/Library/CoreServices/XProtect.bundle/Contents/Resournces/gk.db. It's another sqlite database that we can query.
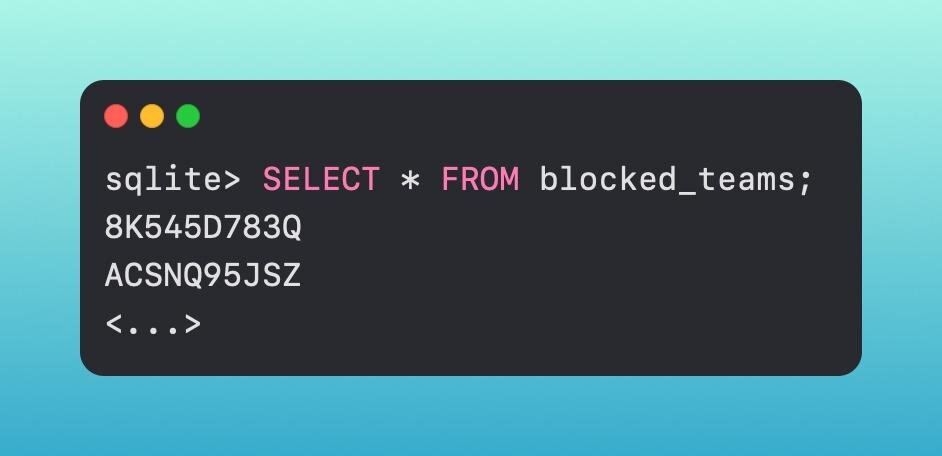
We are checking to see if that team ID is located in this list of 132 items.

The gk.db is used for blocklisting, however, there are also additional databases in the /var/db directory, and more specifically within the gkopaque.bundle and gke.bundle which are used for allowlisting.
Gatekeeper subsequently checks notarization status, which is a process that developers take when developing software. It is an additional step that Apple uses to check software for nefariousness. Gatekeeper also performs additional checks, such as verifying that notarized applications have not been modified by an unauthorized process, even after the first time it is double-clicked.
Gatekeeper's other job is to check if the file has the quarantine bit set. If it contains that 0083 flag, for example, Gatekeeper still needs to check it. Once the user has approved opening the downloaded application, Gatekeeper will perform its other checks.
One aspect of Gatekeeper has been routinely (ab)used by threat actors. Gatekeeper, in a purposeful design by Apple, is able to be overridden. This can simply be done by right-clicking on the application and clicking open. This allows a user to override Gatekeeper. The reason behind this is so users can install apps even though they are unsigned. Personally, I have a few unsigned applications which I know are safe, and without this override ability, I wouldn't be able to open it. Malware like Shlayer uses this ability to skirt around Apple's security mechanisms and social engineers users into opening their apps.
XProtect
Pivoting into the 'Block', XProtect acts as a pseudo-AV on macOS.

At its core, it is a static list of yara rules that was released on November 30, 2017. Yara is designed to capture, in this case - malware, by looking at the bytes or strings within a file, as opposed to a file's hash to developer ID. This allows Apple to cast a wider net, and to potentially uncover malware samples that have not yet been seen in the wild. This XProtect.yara file contains quite an exhaustive list of rules.
Alongside this yara file are a collection of property lists (plist).
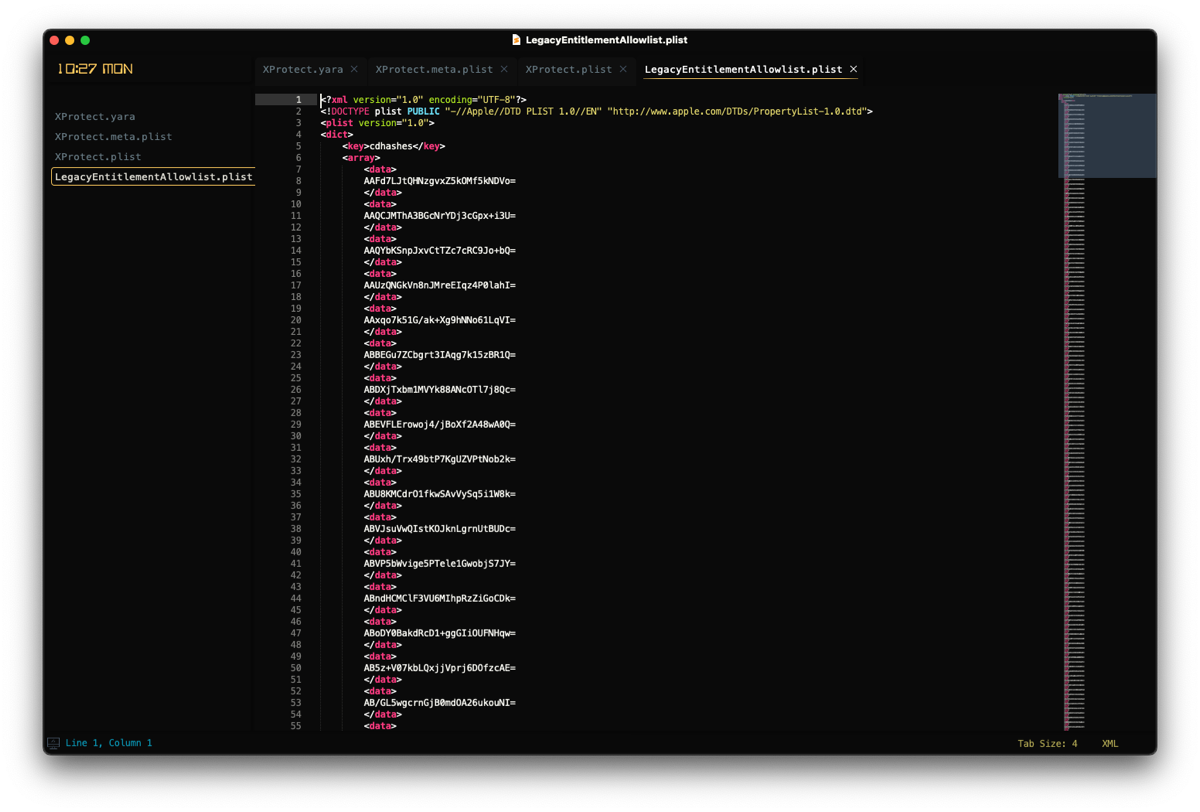
The first one we'll discuss is the LegacyEntitlementAllowlist.plist. We can't say for 100% certainty what this is for but, based on the name, it makes relative sense to speculate that it is a list of applications that need some sort of legacy entitlement in order to run.
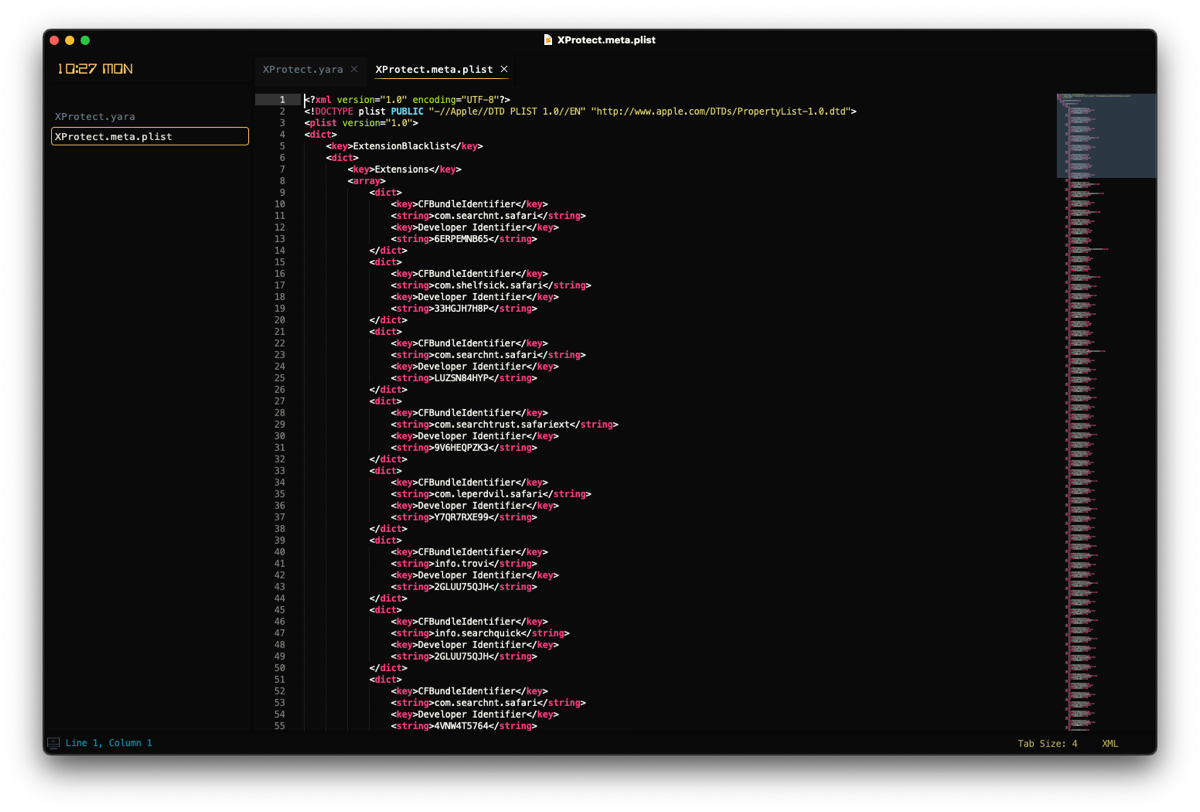
The next file is called XProtect.meta.plist. This blocks things like malicious plugins and/or malicious Safari extensions. Each entry reads a developer ID and bundle ID that it is looking to block. it also will look for certain outdated software like Flash or Java.
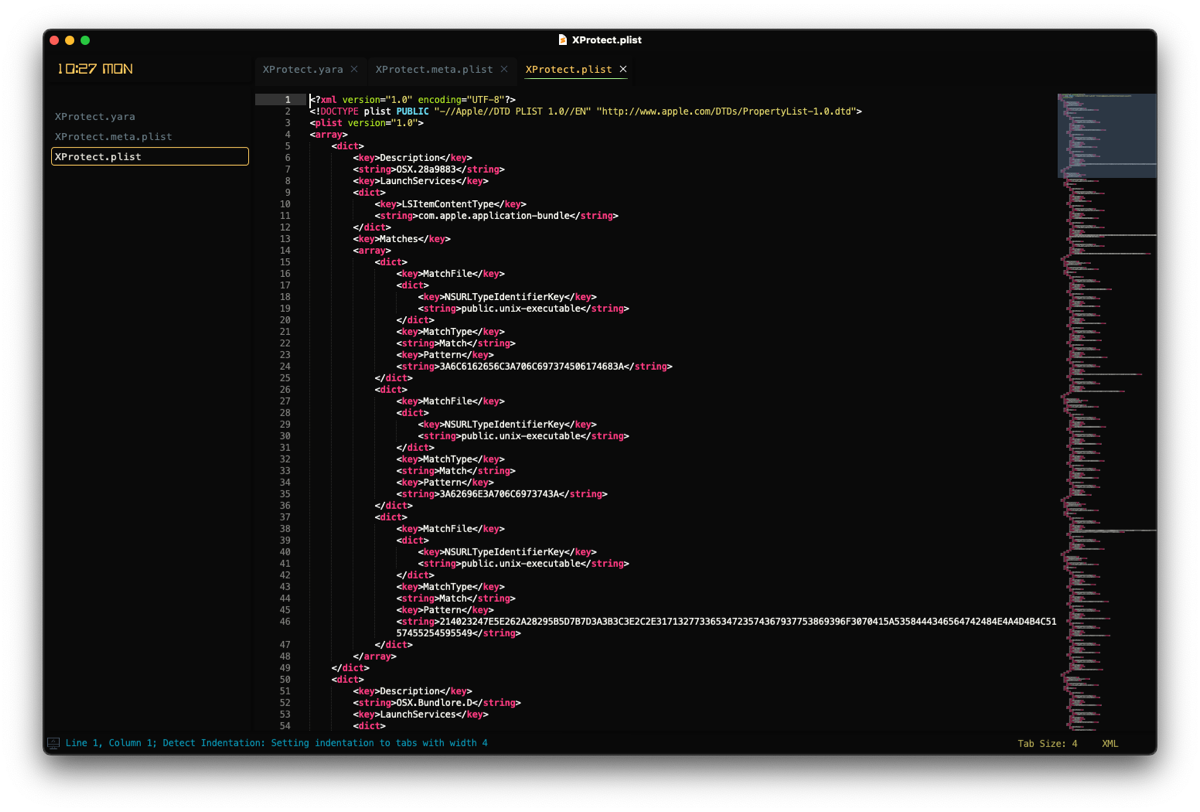
The final file out of the five total is an XProtect.plist. This file has entries called Description, LaunchServices, and Matches.
The Description is quite straightforward - the malware name. LaunchServices is what URI type it should trigger on. This can be something like com.apple.application-bundle, com.microsoft.word.doc, or com.apple.installer-package. Lastly, Matches is an array of dictionary objects that informs XProtect how to detect it, via the NSURLTypeIdentifierKey.
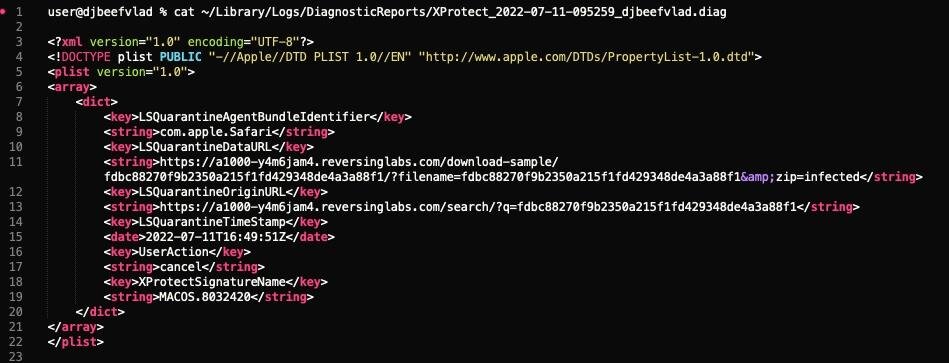
So if XProtect catches something, how can the user know? Well, it will indeed throw a popup to the user stating that it found something and that the user needs to move it to the Trash. If the user does elect to do this, a diagnostics file will be written to disk. This is located in ~/Library/Logs/DiagnosticReports/XProtect_XXX-Mac.diag.
Now we have a record that XProtect did catch and block something, but...what about remediation?
MRT
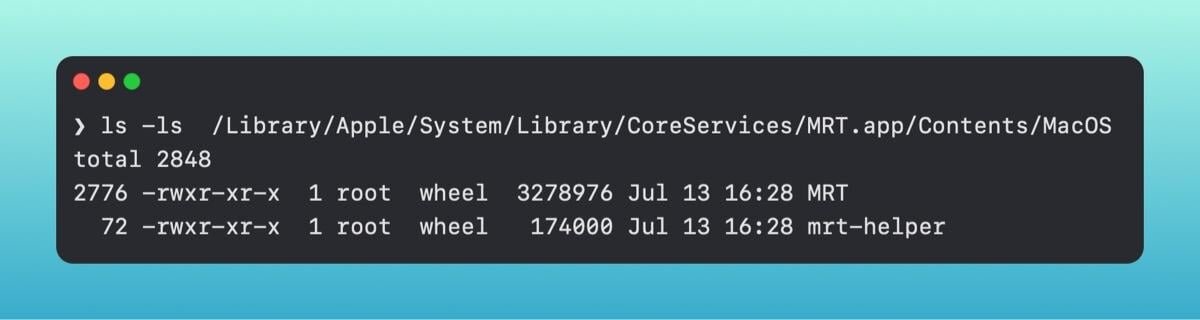
The Malware Removal Tool (MRT) is a system scanner that looks for specific file paths. If it detects any object at that path, it will remove that object. Unlike some of the other tools we talked about, MRT is laid out like a basic application, in an app bundle. Within the file structure are a few different binaries - one called MRT and one called mrt-helper.
MRT runs without any user interaction and can accomplish remediation tasks behind the scenes, but interestingly enough, it can be run directly from the command line.
So if we have malware at one of the paths, MRT should remediate it right when we run it from the command line.
According to NixHacker, if we drop the MRT executable into a disassembler, we can see some of the different paths it looks for. For example, the OSX.ATG2.A malware looks for four different paths.
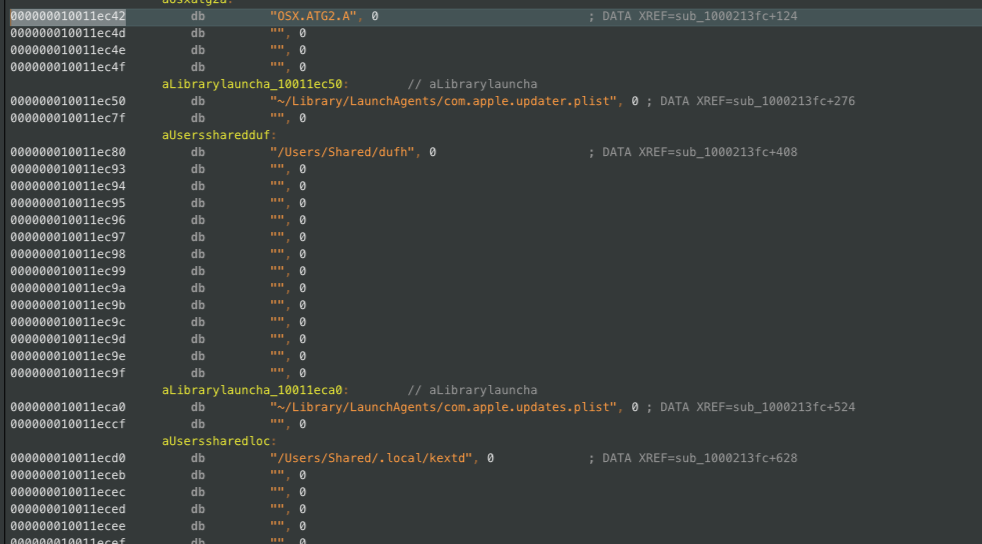
If we then just create empty files at each of those locations, we can see if MRT will indeed remediate it.
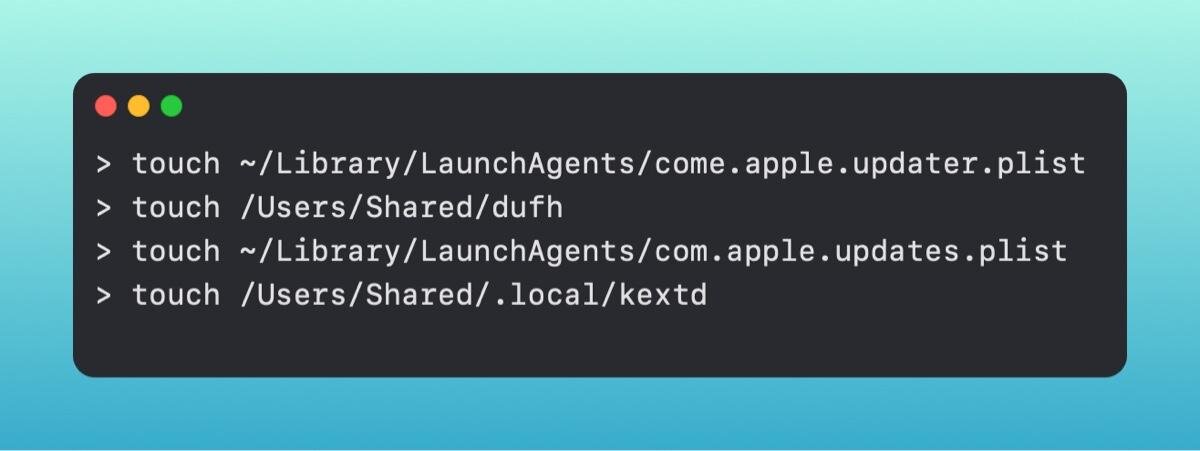
Now, although the files are empty and don't actually contain malware, simply their existence at those file paths should trigger MRT. Let's give it a run and find out.
However, it appears MRT is retiring from macOS.
XProtect Remediator
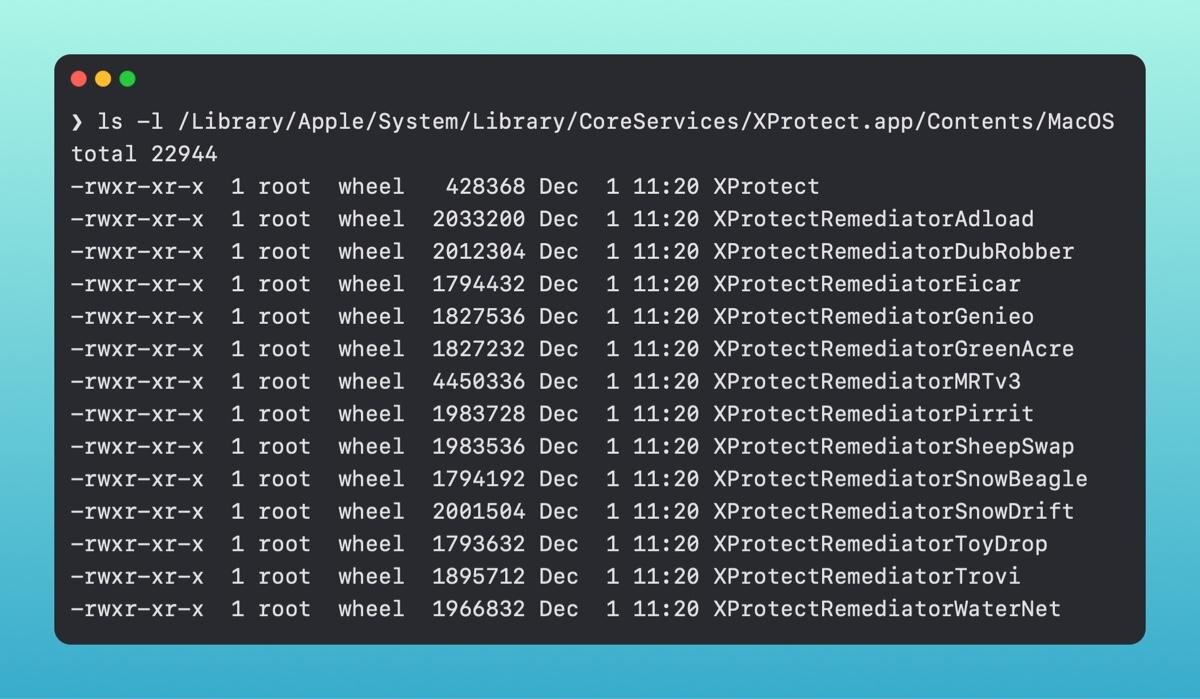
In the release of macOS 12.3, Apple also released a new tool to macOS called XProtect Remediator (XPR). XProtect Remediator is reminiscent of MRT in the sense that it is an app bundle, but instead of just two binaries, there are fourteen. These, for the most part, detect specific families of malware, whereas anything that does not fall into one of them is encompassed by the XProtect binary. There is also an XProtectRemediatorMRTv3 binary, which is almost the exact same size as the MRT binary within the MRT.app. This makes it seem as if this will eventually replace the MRT.app.
You can get visibility into XPR by leveraging the unified logs. which are part of Apple's Endpoint Security.
A few sample entries can be viewed here.

Part of what makes MRT and XProtect Remediator substantially different, is where MRT scans on reboot and login, XProtect Remediator scans on a regular cadence, with a scan for the XCSSET (OSX.DUBROBBER) malware running the most frequently - every hour or two.
Epilogue
A common question that gets asked in conjunction with talking about these tools is - do I need an additional security solution or are these tools enough?
It's a question that I think is dependent on your security posture. For an end user that uses their Mac for personal use, leveraging Apple's existing/pre-installed tools is likely sufficient. If you start using Macs in your business, whether SMB or larger enterprises, having additional security coverage will be more beneficial, as you have more users who will access different websites, developer tools, etc.